Fair Isle Hat & a Lesson Learned
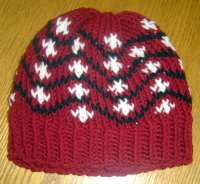
I made a hat using a fair isle pattern from my 1000 Great Knitting Motifs book. I used 60 pegs on the small gauge WonderLoom because the pattern is a 10-stitch pattern.
 What lesson did I learn? It's about the way the yarn is carried or dropped when you're not using it.
The pattern is ten stitches wide and five rows. I used three colors -- red for the main color, black for the wavy stripes, and white for the designs. For the first ten rows of the pattern (which was two complete pattern repeats since the pattern was made up of five rows), I was following the pattern and for each row I was wrapping all red pegs (all pegs for red stitches) for the entire row. Then I would take the white yarn and wrap all white pegs, then all of the black pegs. Then I would knit off the entire row.
After that second set of pattern repeats, I had a light bulb moment. The yarn strands inside the hat were really long, and I figured there must be a way to keep that from happening.
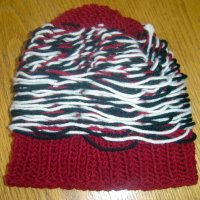
So when I started the next set of pattern repeats, I wrapped and knitted off one peg at a time. If I had a series of three red stitches, I wrapped those three pegs and knitted them off. If the next stitch was white, I would give a little twist so the white yarn was under the red, wrap the peg for the white stitch and then knit it off. I found that the yarn strands were much neater this way. Here are some pictures of the results:
 That's the inside of the hat. I did 10 rows the first way and 10 rows the second way.
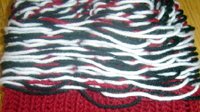
 Here are the yucky long strands that resulted from wrapping each color all the way around, one color at a time. No twisting of the strands means they're all just hanging there. Yuck.
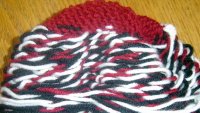
 Here's the result of twisting the strands so the ones that are carried longer get tucked under some of the other stitches. Much neater.
Next time I do one of these I'll remember to take pictures of changing colors and doing the little twist I described. If someone has a better way of doing it, please share it with me. I'd rather not reinvent the wheel if I don't have to (mine would come out square!).
We're off to Myrtle Beach tomorrow for my younger son's National Basketball Championship! It's about a 7-8 hour drive, so I'm hoping to stay awake long enough to get some serious knitting done. I'm sure our spare time will be spent on the beach or doing lots of fun "outdoorsy" things, but I'll find time to knit in the evenings before going to bed. Wish us luck down there!
Thanks for reading!
 What lesson did I learn? It's about the way the yarn is carried or dropped when you're not using it.
The pattern is ten stitches wide and five rows. I used three colors -- red for the main color, black for the wavy stripes, and white for the designs. For the first ten rows of the pattern (which was two complete pattern repeats since the pattern was made up of five rows), I was following the pattern and for each row I was wrapping all red pegs (all pegs for red stitches) for the entire row. Then I would take the white yarn and wrap all white pegs, then all of the black pegs. Then I would knit off the entire row.
After that second set of pattern repeats, I had a light bulb moment. The yarn strands inside the hat were really long, and I figured there must be a way to keep that from happening.
So when I started the next set of pattern repeats, I wrapped and knitted off one peg at a time. If I had a series of three red stitches, I wrapped those three pegs and knitted them off. If the next stitch was white, I would give a little twist so the white yarn was under the red, wrap the peg for the white stitch and then knit it off. I found that the yarn strands were much neater this way. Here are some pictures of the results:
 That's the inside of the hat. I did 10 rows the first way and 10 rows the second way.
 Here are the yucky long strands that resulted from wrapping each color all the way around, one color at a time. No twisting of the strands means they're all just hanging there. Yuck.
 Here's the result of twisting the strands so the ones that are carried longer get tucked under some of the other stitches. Much neater.
Next time I do one of these I'll remember to take pictures of changing colors and doing the little twist I described. If someone has a better way of doing it, please share it with me. I'd rather not reinvent the wheel if I don't have to (mine would come out square!).
We're off to Myrtle Beach tomorrow for my younger son's National Basketball Championship! It's about a 7-8 hour drive, so I'm hoping to stay awake long enough to get some serious knitting done. I'm sure our spare time will be spent on the beach or doing lots of fun "outdoorsy" things, but I'll find time to knit in the evenings before going to bed. Wish us luck down there!
Thanks for reading!


3 Comments:
At 10:48 AM, sarainitaly said…
I hope you know it is all your fault that I ordered the wonderloom and the stitch biible AND the 1000 knitting motifs... haha I love your projects!
In the meantime, I am writing patterns for dishcloths. :OD
At 6:22 PM, Cindy, aka Maxfun said…
Another great hat! Yes, twisting the strands like you did is the best way to go to achieve that nicer, finished look. For the parts where you have long strands, though, you can clean them up with a needle and thread. Just tack them down, being careful to keep all the stitches on the back side of the hat, and then they won't look as "leggy". Great job! :)
At 12:21 PM, Anonymous said…
I have just started using the Knitty looms but have been knitting and crocheting for a number of years. I was wondering while I was working on a square if it was possible to do charted designs with these looms like I knit in the round, now I see you can. Thank you for your excellent directions. You've opened up a whole range of possibilities for me design wise. I used to design Celtic and Fantasy cross stitch patterns but I have been adapting my designs to knitting recently. I'll have to starte playing around after I get my soon to be born granddaughter's blanket done.Your bog is great.
Post a Comment
<< Home